Well Head Installation Video


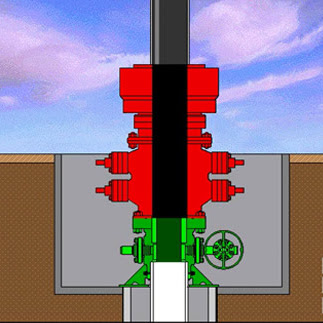
Wellhead installation is one of most fascinating topics and it is very difficult to  visualize how this operation is performed. However, if you see this video, it will make the learning process so easy. This video demonstrate how to a stack wellhead from the beginning to the end of the process. Furthermore, we also add full video transcript which may help some learners to let more understanding.


There may be several strings of pipe in any given well. The number of the strings is determined by the number of zones being drilled through. These can include freshwater, saltwater and potential productions zones. Depicted here are 4 production or ‘pay zones’. Each zone would be cased off or isolated until it is to be produced.

On land, a majority of wells begin with digging a cellar, which can be from 3 to 15 feet in depth. The primary purpose of a cellar is to align the Christmas tree at relative ground-level. Having the Christmas tree at relative ground level allows for easier access to the valves, chokes and other equipment. The first string of pipe to be used in a well is called the conductor pipe or drive pipe. To being, a large diameter hole is drilled to a specified depth, generally relatively shallow, such as 1 or 200 feet. The pipe is driven into the ground to a specified depth or to the point of refusal. In most cases, an adaptor flange or a drilling flange is welded to the conductor pipe as a means to connect a diverter system or blowout preventer system.

Upon completion of the surface hole, the surface pipe is run to a specified depth to isolate any freshwater, saltwater, oil or gas zones within that depth range. The surface pipe is run and cemented in place back to the surface. A cement plug is left in the surface pipe, so that a diverter system or a BOP system may be disconnected or nippled down safely.

After the diverter or BOP system has been nippled down, the surface pipe is drained. Then the adapter flange or drilling flange is cut off. The final cut-off height is determined by adding the height of each piece of wellhead equipment, plus the stand-off distance between each piece of equipment and the rig gasket height. Then the depth of the slip on socket in the bottom of the casing head housing. If a base plate is used, its height must also be considered. The sum of these heights is then deducted from the cellar depth to determine the final cut-off height, for both the conductor pipe and surface casing.

When the final cut on the conductor and surface pipe is completed, the casing head housing is prepared for installation. The casing head housing is welded in place on the surface casing. The pieces welded on the inside diameter and the outside diameter, then tested to assure there are no leak paths in the wells. This test checks the wells, but does not test the integrity of the casing head housing. The base plate which is slightly larger than the conductor pipe, may be tack welded to the conductor pipe, if desired. The base plate serves as a means to transfer weight from the casing head housing back onto the conductor pipe. When the casing head housing has been successfully welded and tested, the BOP system is installed or nippled up and preparations are made to drill out for the intermediate string of casing. To test the BOP system, the test plug is made up from the drilling string and lowered through the BOP system, until properly located in the casing head bowl. Pressure is applied from above the plug and the BOP system is tested.

Upon completion of the BOP tests, the wear bushing running tool is made up on the drill string and the wear bushing installed on the running tool. The wear bushing is then lowered through the BOP system until located in the casing head bowl. The wear bushing is locked in place, either by lockdown pins in the casing head housing flange or by lockdown pins located in a lockdown flange. The running tool is then removed and the drilling operation can resume.

After the hole has been drilled for the intermediate string, the casing is run in the hole and cemented in place. The intermediate string is cemented to a predetermined depth to ensure a good cement bond is obtained between the surface casing and the intermediate casing. A cement plug is left in the intermediate casing, just as it was in the surface casing. The casing is then suspended from the elevators at the rig floor, and the casing hanger is installed either through the BOP system or underneath the BOP system.

In this example the casing hanger will be installed underneath the BOP system. To begin, the BOP system is nippled down and picked up to a height approximately 3 feet. The casing hanger is then installed. Holes are cut in the casing to allow the drilling fluids to drain out of the casing riser. When the casing has drained, a rough cut is made and the balance of the casing riser is removed. The BOP system is removed. The casing spool with a crossover seal is installed. The BOP system is nippled up and preparation is made to drill out for the production casing string.

To test the BOP system the test plug is made up on the drill string and lowered through the BOP system, until properly located in the casing spool bowl. Pressure is applied from above the plug and the BOP system is tested. Upon completion of the BOP tests, the wear bushing running tool is made up on the drill string and the wear bushing installed on the running tool. The wear bushing is then lowered through the BOP system until located in the casing spool bowl. The wear bushing is locked in place either by lockdown pins and the casing spool flange or by lockdown pins located in a lockdown flange. The running tool is then removed and the drilling operation can resume.

The production casing string is generally run to the total depth of the well and is the casing string in which the production packer is installed. When the hole is drilled and the production casing is run and cemented in place, the casing hanger is installed. The casing riser is drained. A rough cut is made and the BOP system removed. The final cut is made to the production casing in preparation for installation of the tubing spool. The tubing spool with a crossover seal is installed in the same manner as the casing spool. After the tubing spool has been installed, the seals and connection are tested and the BOP system is nippled up.

Preparations are now made to run production tubing in the hole. Production tubing is considered any pipe string 4 inches in diameter or less, though sometimes larger sizes of pipe are used. When the plug has been drilled out and a cleanout trip completed, the perforating gun is run in the hole and the casing is perforated or shot. The downhole packer assembly is run and installed in the production casing. A packer is in essence a CO assembly that isolates the reservoir from all strings of pipe, except the production tubing. The production tubing is run with a bottom hole assembly to seal inside the packer. After the tubing is spaced out and proper weight set on the packer, the tubing hanger is installed at the tubing on the rig floor, then lowered into the bowl of the tubing spool. The BOP system is nippled down and preparations are made to install the production Christmas tree.

The production Christmas tree is made up of a seal flange which is often called the tubing head adapter, a series of gate valves, a T or cross, rig valves or side valves, and a choke. The Christmas tree is the group of equipment that controls the flow of the well. Each Christmas tree has one or more surface safety valves that will shutdown the well in an emergency, and prevent damage to the equipment downstream. To install the Christmas tree, determine the direction the Christmas tree should be installed, pick it up, level it and lower it over the extended neck of the well drill tubing hanger. The Christmas tree is nippled up to the tubing spool, and the connections and seals are tested. The well is now ready for production testing.

source: http://www.drillingformulas.com/well-head-installation-vdo/

10 Aplikasi Membuat Flowchart Gratis Terbaik untuk PC


1. yEd – Graph Editor

yEd – Graph Editor adalah aplikasi untuk membuat flowchart yang sangat mudah digunakan. Aplikasi ini dapat membuat banyak flowchart sekaligus dan menyediakan banyak grafis dan kita dapat mewarnai dan menghubungkan shape-shape tadi.
Diagram yang telah dibuat, bisa diekspor ke format SWF, SVG, PDF, HTML, PNG, dll. Terdapat juga pilihan structure view atau full screen view. Kamu dapat menggunakan aplikasi ini untuk membuat UML, diagram Computer Network, ERD, dan diagram populer lainnnya. Tersedia juga dalam versi portabel serta dukungan bahasa Jerman.
Aplikasi ini berbasis Java, jadi kamu harus punya Java Runtime dulu di PC sebelum bisa menjalankan aplikasi ini.

2. Dia

Dia adalah aplikasi dengan banyak fitur yang dapat membuat flowchart, diagram UML, diagram Assorted, Network Diagram, Circuit, dan banyak jenis diagram lain secara efektif.
Aplikasi ini menyediakan banyak simbol dan peralatan pembuatan diagram. Kamu dapat membuat beberapa flowchart/diagram dengan fitur multiple tabs. Diagram yang sudah selesai, dapat diekspor ke format SVG, PS, PNG, JPG, GIF, dll.

3. Dynamic Draw

Dynamic Draw adalah aplikasi yang bagus untuk membuat flowchart dan diagram populer lainnya. Aplikasi ini menyediakan lebih dari 15 bentuk flowchart berbeda, beberapa diantaranya adalah: Terminator, Process, Decision, Data, dan Connector.
Kamu bisa menambahkan gambar kamu sendiri ke flowchart. Selain itu, diagram yang selesai dibuat bisa diekspor ke SVG, WMF, TIF, GIF, PNG, atau format lain dengan background transparan.

4. ClickCharts Diagram Flowchart Software

ClickCharts Diagram Flowchart Software dapat membuat banyak flowchart sekaligus. Aplikasi ini menyediakan banyak jenis simbol yang berguna dalam membuat diagram alur. Kamu juga diberi fitur untuk menambahkan pointer, teks, dan gambar.
Setelah membuat diagram, kamu dapat mengekspornya ke format gambar populer serta format file PDF. Dengan aplikasi ini kamu juga dapat membuat diagram UML, ER Diagram serta Data Flow Diagram. Aplikasi ini berukuran kecil (file setupnya hanya 420 KB) dan dapat digunakan di Mac OS X, Android, dan Kindle.

5. Pencil

Pencil adalah aplikasi menggambar yang awalnya digunakan untuk membuat gambaran di desktop dan mobile, tapi juga dapat digunakan untuk membuat flowchart serta diagram lain.
Mendukung pembuatan beberapa flowchart sekaligus dan menyimpannya ke file PNG, HTML, PDF, SVG, dll. Aplikasi ini memiliki 10 jenis kategori shape berbeda dimana setiap kategori berisi banyak gambar/shape. Ada juga gambar clip art yang dapat kamu download dari servernya Pencil. Selain itu, aplikasi ini juga tersedia dalam versi Mac OS, Linux, serta ekstensi Firefox.

        | BACA JUGA : Buku Self Development Terbaik di Dunia

6. Diagram Designer

Diagram Designer dapat membuat desain sirkuit elektrik, flowchart, desain GUI, serta diagram UML. Untuk flowchart, tersedia lebih dari 25 simbol.
Juga, tersedia bagian yang menunjukkan daftar lengkap dari simbol yang digunakan pada flowchart. Aplikasi ini dapat menyimpan diagram ke format PCX, GIF, MNG, CUR, ICO, dan banyak lagi. Aplikasi ini berukuran kecil dan mendukung antarmuka dalam berbagai bahasa.

7. Diagram Ring

Diagram Ring dapat membuat flowchart yang penuh warna, pie chart, grafik, DFD, UML, dan ERD.
Aplikasi ini menyediakan shape dalam bermacam jenis dan kamu dapat menghubungkannya dengan 10 jenis ujung berbeda. Diagram dapat diekspor dalam format JPG. File setupnya kecil, hanya 1 MB.

8. Software Ideas Modeler

Software Ideas Modeler dapat digunakan untuk membuat diagram UML, diagram BPMN, diagram SysML, flowchart, dan banyak macam diagram lain.
Aplikasi ini dapat membuat banyak flowchart dalam satu waktu dengan disediakannya banyak shape serta kamu dapat mengekspornya ke format file gambar dengan background transparan seperti SVG, PDF, PNG, TIFF, GIF, dll. Tersedia juga versi portabelnya.

9. Edraw Mind Map

Edraw Mind Map dapat membuat banyak jenis flowchart, diagram, dan grafik dengan mudah.
Kamu dapat membuat 2 flowchart sekaligus dan menyimpannya dalam format gambar populer seperti PDF, Visio, SVG, PS, HTML, dll. Aplikasi ini menyediakan banyak fitur dan banyak jenis shape flowchart. Kategori shape nya antara lain: Background, Border, Arrow Shape, Basic Flowchart Shape, serta Mind Map Shape.

10. Google Drive

Kita dapat menggunakan layanan online Google Drive untuk membuat flowchart. Aplikasi ini menyediakan banyak fitur yang berguna untuk membuat flowchart, seperti: shapes, gambar, arrows, peralatan mewarnai, dll. Google Drive dapat menyimpan diagram ke format file PDF, PNG, SVG, dan JPG.


source: www.downloadsoftwaregratisan.com

7 Situs untuk Belajar TOEFL Secara Gratis


Mencapai view harian hingga sekitar 200 ribu view, menjadikan situs learn4good.com salah satu situs terpopuler untuk belajar TOEFL, terutama TOEFL iBT yang dilakukan secara online maupun tertulis.
Dalam situs ini dijelaskan secara mendetail mengenai tujuan tes TOEFL, penjelasan mengenai TOEFL berjenis iBT, cara penilaian, jumlah pertanyaan di tiap sesi dan waktu untuk menyelesaikan tes.
Tidak ketinggalan, berbagai macam jenis soal yang sudah dikelompokkan berdasarkan sesi reading dan writing tersedia secara gratis. Terdapat pula soal-soal latihan yang sudah dibagi dalam topik-topik tertentu, misalnya mengenai adjective clause, adverb clause, dan sebagainya.
Situs ini menyediakan contoh 11 tes singkat dengan 25 pertanyaan di setiap tes serta 17 bagian latihan-latihan singkat. Pertanyaan-pertanyaan dalam situs ini cukup baik untuk membantu Anda mempersiapkan tes TOEFL.

Examenglish.com juga menjadi situs yang cukup populer untuk melatih kemampuan bahasa Inggris dalam mempersiapkan tes TOEFL.
Situs ini menyediakan informasi mengenai tempat-tempat untuk melaksanakan tes TOEFL iBT secara online, biaya yang diperlukan, serta tips-tips lainnya yang cukup bermanfaat.
Terdapat soal-soal latihan yang dibagi ke dalam 5 kategori, yaitu reading, listening, speaking, structure, dan vocabolary.
Untuk soal latihan reading, terdapat 4 bagian soal berbeda yang masing-masing terdiri dari 12-14 soal yang harus dijawab berdasarkan sebuah paragraf panjang dengan jumlah kata kira-kira 700.
Seperti biasa untuk sesi reading, topik berkisar mengenai teks akademik seputar exposition, argumentasi, serta narasi atau biografi sejarah.
Untuk soal latihan speaking, terdapat 6 bagian dengan masing-masing bagian memerlukan 20 menit. Setiap jawaban Anda akan direkam dan kemudian dinilai.
Untuk soal latihan listening, terdapat 5 lectures dan 3 conversations, dimana dari setiap materi yang diperdengarkan, Anda harus menjawab 6 pertanyaan dari lecture dan 5 pertanyaan dari conversation. Untuk menyelesaikan seluruh sesi, Anda membutuhkan waktu hanya sekitar 60-90 menit.
Terdapat 4 bagian tes struktur yang menguji seberapa dalam Anda memahami grammar bahasa Inggris. Masing-masing bagian terdiri dari 20 soal yang harus diselesaikan selambat-lambatnya 20 menit.
Di bagian vocabulary, Anda juga dapat belajar lebih lanjut mengenai berbagai kata yang perlu diketahui dan sering muncul dalam tes TOEFL. Biasanya kata-kata ini merupakan istilah akademik, terdapat 10 grup istilah yang dapat Anda pelajari.
Situs ini cukup membantu untuk belajar TOEFL, apalagi dengan view hariannya yang dapat mencapai sekitar 100 ribu view.

Metacafe.com merupakan salah satu situs terbesar yang menyediakan berbagai macam video, termasuk yang menunjang Anda dalam mempelajari TOEFL.
Di dalam video berdurasi singkat yang kurang dari 10 menit, Anda secara cuma-cuma mendapatkan pengetahuan lebih mengenai tips-tips meraih skor yang tinggi dalam tes TOEFL.
Contohnya saja, terdapat video mengenai tips mendapatkan 1.700 istilah yang digunakan dalam tes TOEFL, cara mengerjakan TOEFL tanpa kendala berlebih, tips meningkatkan kemampuan reading, meningkatkan konsentrasi saat tes, dan berbagai tips lainnya yang tentu sangat berguna untuk Anda yang sedang mempersiapkan diri untuk tes TOEFL.

Walaupun tidak secara langsung menyediakan soal-soal TOEFL, namun situs ini menyediakan ribuan video untuk membantu Anda yang sedang berusaha meningkatkan skor TOEFL.
Dalam situs engvid.com, terdapat berbagai macam video yang sudah dikategorikan berdasarkan levelnya, yaitu level 1 untuk pemula (beginner), level 2 untuk menengah (intermediate), dan level 3 untuk lanjutan (advanced).
Anda juga dapat memilih pelajaran apa yang ingin ditonton dalam video, dapat berupa business english, comprehension, culture, grammar, pronounciation, speaking, vocabulary, writing, dan sebagainya.
Terdapat pula 11 guru yang bisa Anda pilih jika menyukai gaya pengajaran guru tertentu. Dengan total 1065 lessons dalam bentuk video, tentunya Anda tidak akan pernah kehabisan bahan untuk memperdalam kemampuan bahasa Inggris.

Inilah situs yang juga menyediakan berbagai macam bahan untuk mempelajari bahasa Inggris secara gratis.
Situs english-test.net menyediakan berbagai macam fasilitas seperti soal-soal latihan, guide untuk pembelajaran bahasa Inggris, contoh-contoh esai yang mirip dengan esai pada tes TOEFL, flashcard, practice test, juga forum untuk berdiskusi.
Latihan-latihan soal yang disediakan juga difasilitasi dengan pemberian nilai, sehingga Anda bisa memperkirakan sendiri sejauh apa kemampuan TOEFL Anda sudah berkembang.
Di samping tes-tes yang disediakan, situs ini juga menyediakan artikel-artikel yang menjelaskan grammar secara runut.

Situs ini menyediakan pula contoh-contoh soal latihan tes TOEFL, terutama untuk structure dan reading.
Dalam situs testmagic.com, terdapat 210 soal-soal contoh structure yang dibagi menjadi 10 soal per bagian. Setelah menjawab keseluruhan soal, jawaban akan langsung dinilai dan ditampilkan beserta dengan perkiraan skor TOEFL.
Untuk bagian reading, terdapat 2 bagian dengan total 48 soal yang bisa pula Anda kerjakan sebagai latihan untuk meningkatkan skor TOEFL.
Selain itu, dalam situs ini terdapat contoh mengenai beberapa topik esai pada TOEFL dan juga penjelasan-penjelasan atas pertanyaan dalam beberapa buku TOEFL.

Satu lagi situs yang menyediakan latihan-latihan soal secara online. Dalam situs toeflibtcourse.com, pengunjung disediakan contoh latihan secara menyeluruh, mencakup reading, listening, speaking, dan writing.
Untuk bagian reading, terdiri dari 4 bagian dengan 39 pertanyaan yang harus diselesaikan dalam waktu 1 jam.
Dalam bagian listening, ada 6 pembicaraan yang digunakan untuk menjawab 34 pertanyaan dalam waktu 45 menit.
Sementara itu, pada bagian speaking, Anda akan diminta respon mengenai 2 percakapan, 2 lectures, dan 2 pembicaraan dalam topik akademik.
Yang terakhir, dalam bagian writing terdapat 2 bagian yang menguji kemampuan Anda merangkai kata dalam bahasa Inggris.
Karena hanya terdiri dari satu buah contoh keseluruhan tes TOEFL, ada baiknya Anda mencoba contoh tes keseluruhan ini saat sudah benar-benar belajar dan merasa yakin untuk memprediksikan nilai.

source: www.tipsbelajarbahasainggris.com